Lightning Web Components (LWC) is a modern web development framework that allows us to build fast and responsive web components on the Salesforce platform. This article is part of a series of articles on the LWC Development Series. In earlier lessons, we did environment setup for LWC components and studied the basics of JavaScript. Now, this is the time, we should kick off with the creation of our Hello World LWC component.
We’ll start by setting up our development environment and creating a new SFDX project. Then, we’ll create and deploy our first LWC component. We then understand the basic code for Hello Word LWC Component. After deploying that code, we will create a Lightning Component Tab and point our component to it. By the end of this article, you’ll have a solid understanding of the basics of LWC development and be ready to kick off further development in your very own apps. So let’s get started!
Setting up the ground for Hello World LWC Component
To set up the ground, we need two things, an SFDX Project and an Org to deploy our SFDX component. Let’s make it.
Creating SFDX Project
1. Open the Command Palette: In VS Code, open the Command Palette by pressing “Ctrl + Shift + P” on Windows or “Cmd + Shift + P” on Mac.
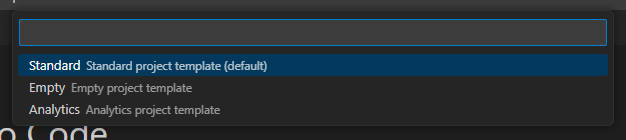
2. Create a new SFDX project: In the Command Palette, type “SFDX: Create Project with Manifest” and hit enter.

3. Choose the standard template
4. Choose the folder and select the location to save it.
Authorizing the Org
1. Open the Command Palette: In Visual Studio Code, open the Command Palette by pressing “Ctrl + Shift + P” on Windows or “Cmd + Shift + P” on Mac.
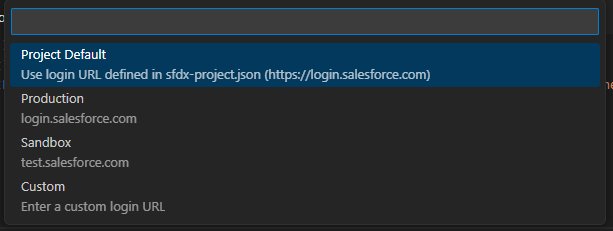
2. Type “SFDX: Authorize an Org”: In the Command Palette, type “SFDX: Authorize an Org” and hit enter.
3. In case you are using Dev org, choose Production, or choose Sandbox.
4. Give a name to your org and hit enter.
5. It will open your browser and respective login page (Production/sandbox).
6. Enter your credentials and log in to the org, It will show you one prompt. Click on Allow and get back to VS Code. You can see your org name at the bottom left corner of VS Code. It means your org is successfully authorized.
Creating the first LWC component
Once you are done with all the above setup, you are halfway to creating your first LWC component. After creating SFDX Project, you will find a specific folder structure in your VS Code. That is nothing but your SFDX Project itself. You need to follow this path: force-app > main > default > lwc. This will be the folder, where we will be storing the metadata of all LWC components.
Follow the below steps to create the LWC component:
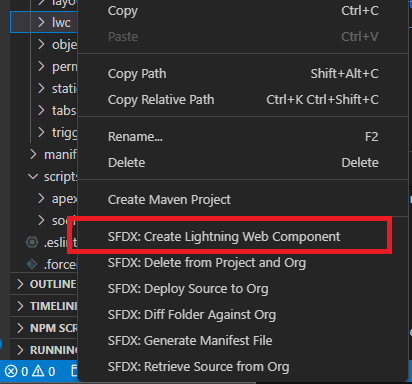
1. Right-click on the “lwc” folder and click on “Create Lightning Web Component”
2. It will prompt you to ask for the name of your LWC component. Make sure you are not putting space in that.

3. After that, it will ask you to choose the location. Choose the default one and hit enter. It will show the below prompt in the bottom right corner:
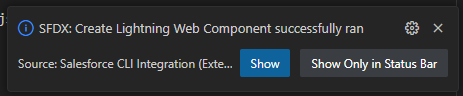
4. Congratulations! You just created your first LWC component on VS code.
Understanding the structure of the LWC Component
You will find three files under the folder of your LWC component. What are these three files? And how to deal with it?
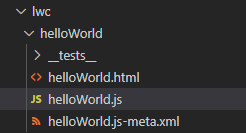
1. The HTML file: This is the file, where we will code the front end of our LWC component. This is nothing but a template file of the LWC component which will be containing an HTML source.
2. The JavaScript file: This file is the brain of your LWC component. As the file extension suggests, it will be containing the JavaScript source code of your LWC component.
3. The XML file: This is the meta-data file of the component. We can expose the components to various targets with the help of this file.
Let’s code this component for Hello World
1. Copy and paste the below code into the helloWorld.html file.
Here, we are using lightning cards, which are available in the lightning design system component library. We are also using one input field, from Lightning Component Library. This takes the input and invokes the method, named as changeHandler. Whenever the input is changed, this method is invoked.
<template>
    <lightning-card title="HelloWorld" icon-name="custom:custom14">
      <div class="slds-m-around_medium">
        <p>Hello, {greeting}!</p>
        <lightning-input label="Name" value={greeting} onchange={changeHandler}></lightning-input>
      </div>
    </lightning-card>
</template>
2. Copy and paste the below code into the helloWorld.js file.
Here, as you can see, the “World” string is assigned to a variable greeting, which was used in the above HTML file. It means, if there is no input, the “World” word will be used. Below that, one method is written name as “changeHandler”. It’s the same method, which gets invoked when there is a change in input. This method simply assigns that input to the variable “greeting”. This change will be then reflected on the front end. In short, whatever you type in the input box, will be reflected on the front end.
import { LightningElement } from 'lwc';
export default class HelloWorld extends LightningElement {
  greeting = 'World';
  changeHandler(event) {
    this.greeting = event.target.value;
  }
}
3. Copy and paste the below code into the helloWorld.js-meta file:
This file should be already containing some code. Here with our changes, we are exposing the component by making the <isExposed>parameter true. We are also setting targets. This defines where this LWC component can be placed.
<?xml version="1.0" encoding="UTF-8"?>
<LightningComponentBundle xmlns="http://soap.sforce.com/2006/04/metadata" fqn="helloWorld">
<apiVersion>55.0</apiVersion>
<isExposed>true</isExposed>
<targets>
<target>lightning__AppPage</target>
<target>lightning__RecordPage</target>
<target>lightning__HomePage</target>
<target>lightning__Tab</target>
</targets>
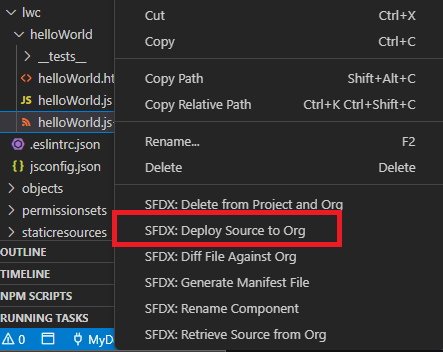
</LightningComponentBundle>4. Now, right-click on the component folder or any file inside it and click on deploy.
Creating a Tab for the Hello Word LWC component
Now, in order to see this LWC component in action, let’s create a Lightning Component Tab in our target org, pointing to our LWC component.
1. Open Setup in your org and Search “Tabs”
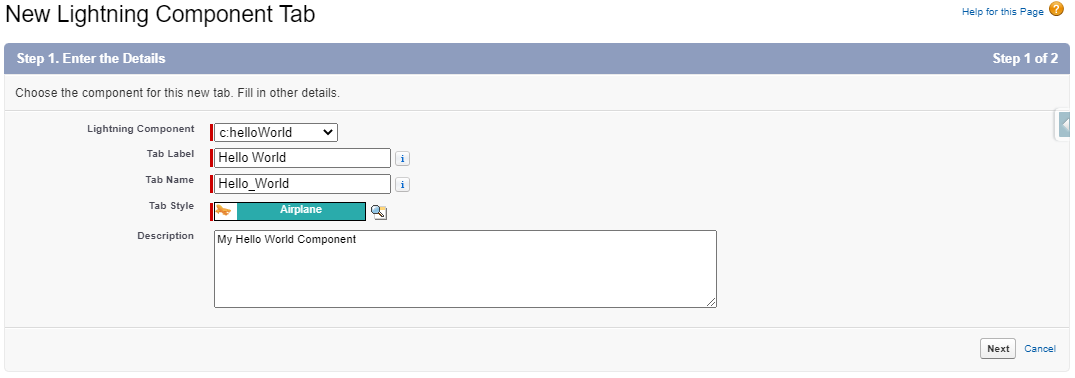
2. Create a new “Lightning Component Tab”
3. Choose your component from the list, give a name to the tab, and choose Tab style as well. It should look like below:
4. Now click on next. On the next screen, for now, keep it as default ON and click Save.
It’s time to see your very first Hello World LWC Component in Action:
Click on the App Launcher icon, Search for “Hello World”, and click on it. You will able to see your own very first Hello World LWC Component:

Try changing the input, and you will see the change above:

Conclusion
In this article, we’ve covered the basics of creating your first LWC component, from setting up your development environment to deploying your component. We started by creating an SFDX project and authorizing our org, then created and deployed our first LWC component. We then created a Lightning component Tab pointing to our component.
With these skills in hand, you’re well on your way to becoming a proficient LWC developer.
Abhishek
Mr. Abhishek, an experienced Salesforce Application Architect with over 8+ years of development experience and 11x Salesforce Certified. His expertise is in Salesforce Development, including Lightning Web Components, Apex Programming, and Flow has led him to create his blog, SFDC Hub.