Lightning Web Components (LWC) provide a modern approach to building web applications on the Salesforce platform. One of the key features of LWC is its Lifecycle Hooks. It allows developers to intervene at specific phases in a component’s lifecycle. By using Lifecycle Hooks, we can customize the behavior of our components and perform tasks such as initializing properties, updating state, and performing post-rendering actions.
Understanding the Lifecycle Flow of a component is required for leveraging Lifecycle Hooks effectively. In this post, we will explore the four main stages in the Lifecycle Flow of LWC and the key Lifecycle Hooks that are associated with respective stages. We will also discuss how the Lifecycle Flow changes when working with parent and child components, and provide some considerations to remember when working with LWC.
Understanding the Lifecycle Flow and Lifecycle Hooks of LWC
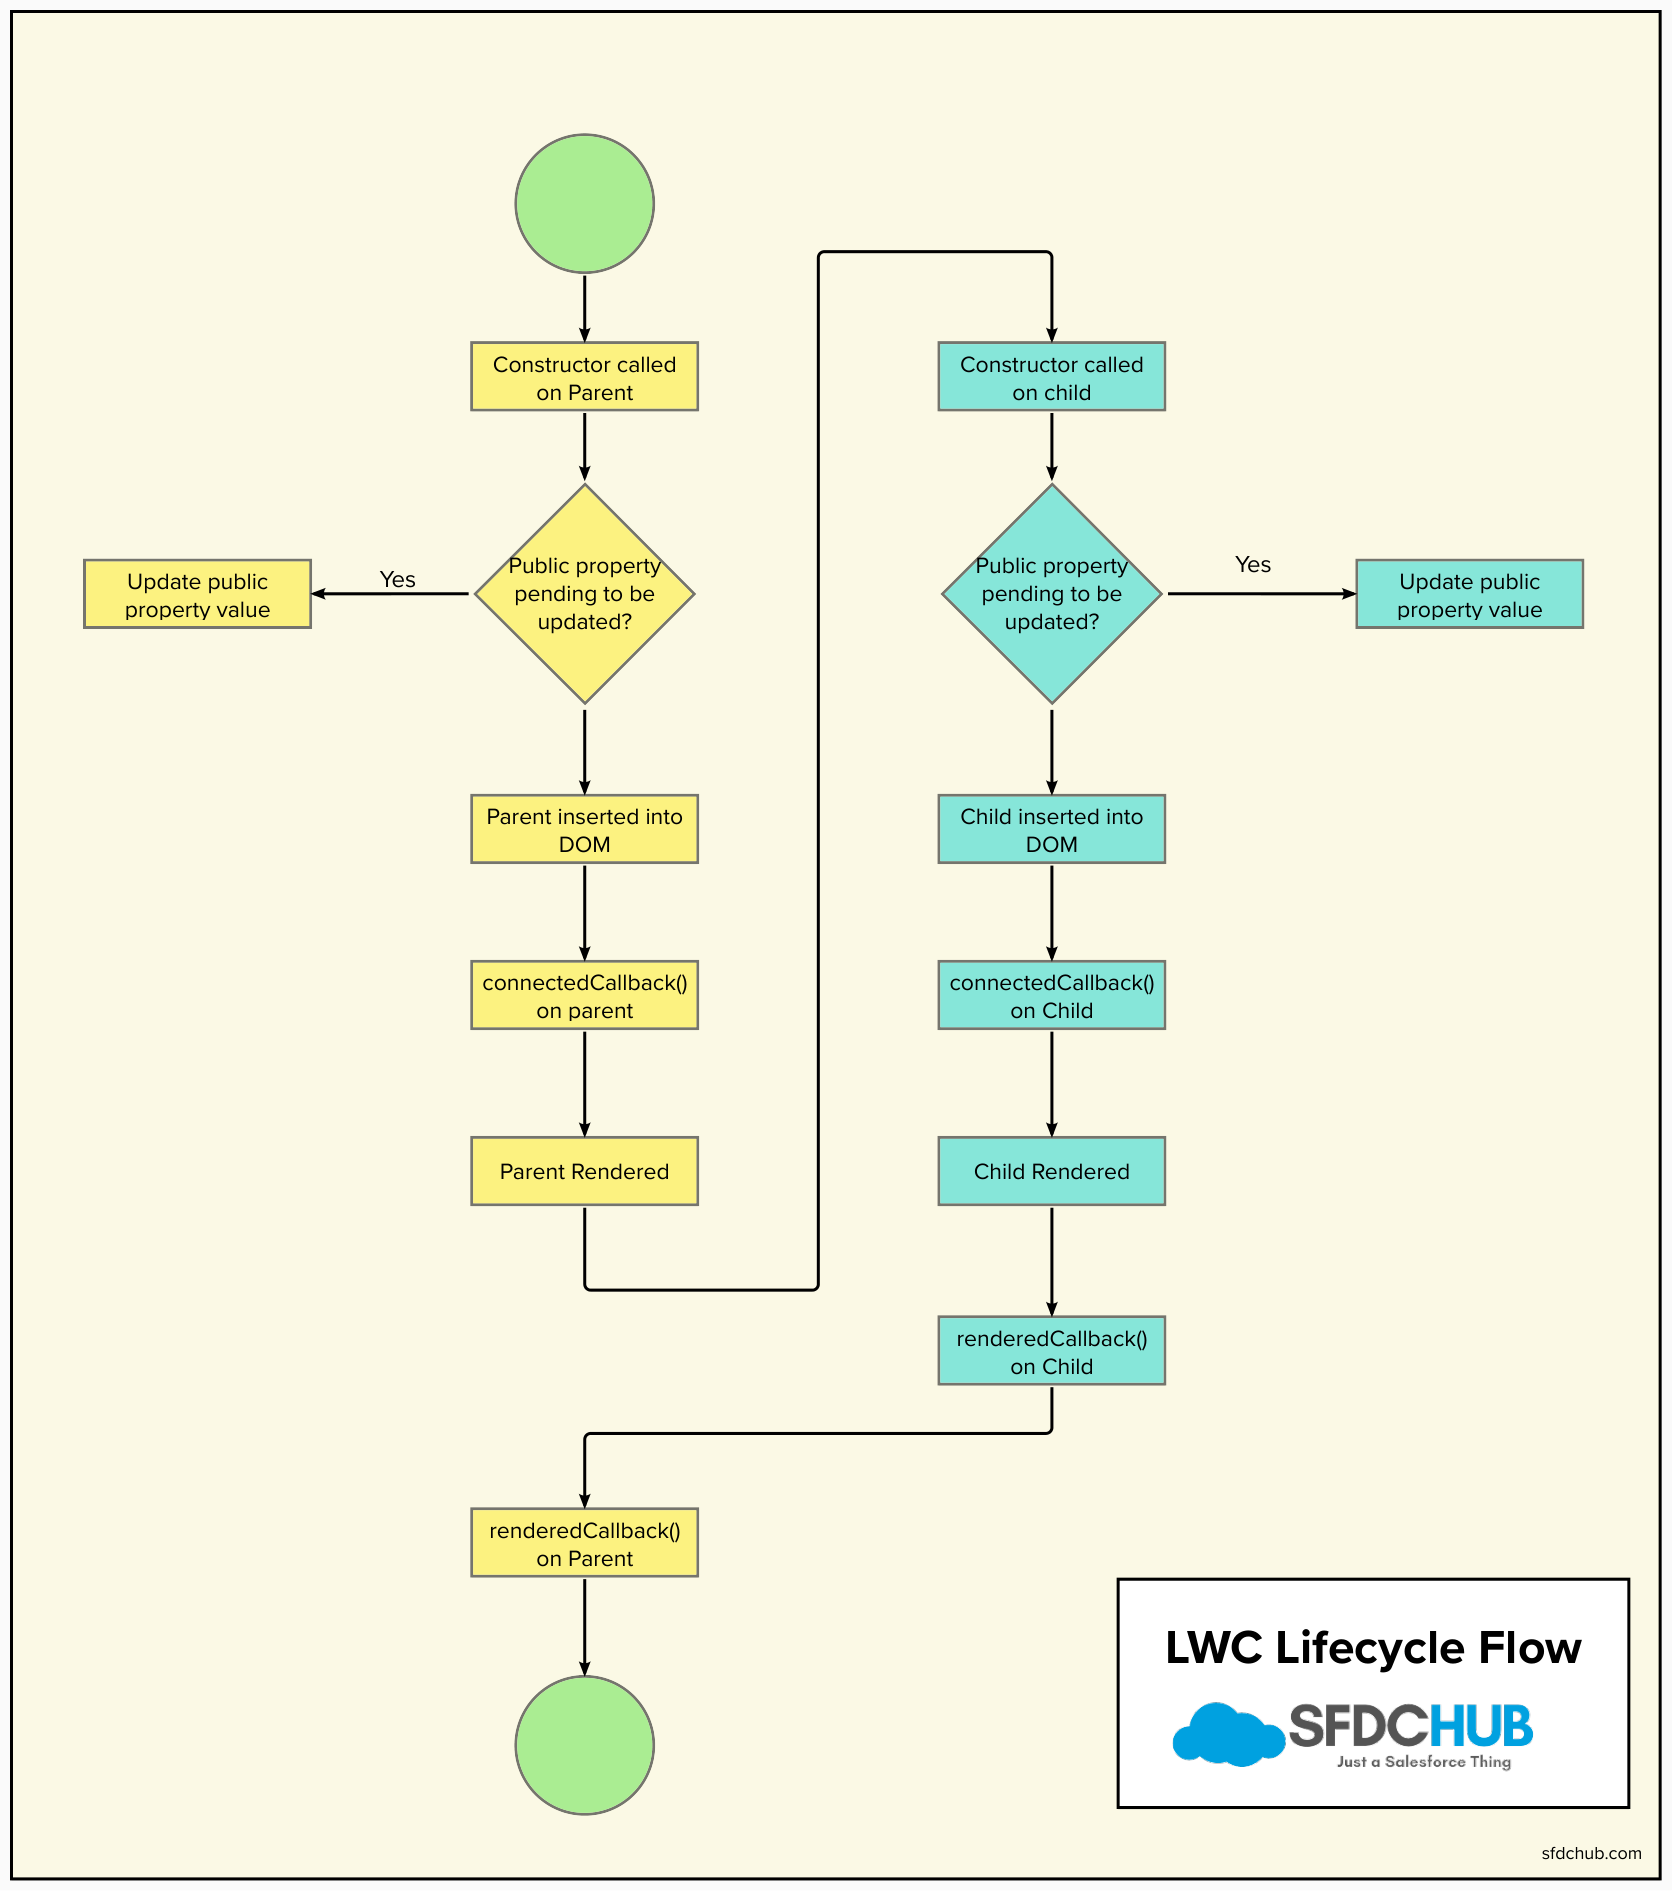
For effective use of Lifecycle Hooks, it is required to understand the Lifecycle Flow of a component. This Lifecycle Flow describes the phases of the LWC Component. These phases or nothing but events that occur when a component is created, updated, inserted into the DOM, and ultimately destroyed. The Lifecycle Flow consists of four main stages: component creation, updating public properties, parent insertion in DOM, and rendering.
The first stage of this Lifecycle Flow is component creation. At this stage, the component is first created, and its initial properties and state are set. The lifecycle hook constructor() method is used to initialize the component’s properties during this stage. The second stage is updating public properties. Here, the component’s public property is updated. The setter method is used to update the component’s state when a public property changes during this stage.
The third stage in the Lifecycle Flow is parent insertion in DOM. At this stage, the parent component is inserted into the DOM. The hook connectedCallback() method is used at this stage. It is called after the component is added to the DOM. The fourth and final stage is rendering, where the component is rendered and displayed on the page. The renderedCallback() method is used during this stage, and it is called after the component is rendered.
Let’s understand these stages in detail and explore the associated Lifecycle Hooks that can be used to customize a component’s behavior.
To understand the lifecycle of the LWC component in detail, we need to know the working of LWC Lifecycle methods, which we often call as lifecycle hooks. This flow actually defines the LWC execution order of these methods. In a way, we will understand the sequence of events in LWC.
constructor() in LWC
The component creation stage is the first stage in the Lifecycle Flow of an LWC Component. It occurs when a component is first created, and its initial properties and state are set. During this stage, the constructor() method is used to initialize the component’s properties.
The constructor() method is a Lifecycle Hook in LWC that is automatically called when the component is created. This sets up the initial state of the component and is used to initialize the component’s properties. This hook/method can take parameters, which can be used to set the initial value of the component’s properties.
This method can also be used to perform any other initial setup that is required for the component. For example, it can be used to initialize variables, register event listeners, or set up any required third-party libraries.
Let’s understand this with the example below:
import { LightningElement } from 'lwc';

export default class HelloWorld extends LightningElement {
    constructor() {
        super();
        this.message = 'Hello, World!';
    }
}
In this example, we are creating a simple component LifecycleFlow that extends the LightningElement base class. Inside the constructor() method, we are calling super(). It is must to call the constructor of the base class. After this, we are setting the value of the message property to 'Hello, World!'.
By using the constructor() method to set the initial value of the message property, we can ensure that the property is set correctly when the component is first created. This will help us to ensure the component functions as expected and has the necessary properties and states to perform its intended tasks.
Here, we need to note one thing the constructor() method is only called once during the component’s lifetime when the component is first created. In case, we destroy the component and again create it, then the constructor() method will be called again to initialize the component’s properties and state.
By customizing the constructor() method, we can ensure that their components are set up correctly and have the necessary properties and states to function properly.
Things you CAN’T do inside the constructor():
- You can not access elements of the component or child component’s elements inside the constructor():
The constructor hook is called at the stage of component creation, the rest all the other stages are followed after this. It means the elements or child’s elements are not exist yet. Hence you can not access those elements as they simply it does not exist. - You can not create and dispatch events from the constructor():
As we know, after the execution of the constructor at the time of component creation, that component is inserted inside DOM. It means whatever events you dispatch will not make any sense as the component itself is not inside DOM. In case you try it, you will get an error. - You can not access the element’s public property:
As public properties are set after the execution of the constructor, you can not access them before as they are simply not set already. - Do not use return inside the constructor body unless it’s an early return.
- Don’t use methods
document.write()ordocument.open().
You CAN do this inside the constructor():
- You can call Apex methods inside the constructor:
You can make an imperative call to the Apex method to fetch the data you want. - You can set the properties within the constructor
- You can use Navigation Service in the constructor
- You can call UI API inside the constructor
Stage of Updating Public Properties in the LWC Lifecycle
The stage of updating public property occurs when a component’s public property is updated. Public properties are defined with the @api decorator in Lightning Web Components. These properties can be set and accessed by other components, mostly parent components.
During this stage, when public property is updated, the setter method is used to update the component’s state. The setter method is a special method that is automatically called when a property’s value changes. It is responsible for updating the component’s state based on the new value of the property.
In addition to updating the component’s state, the setter method can also perform other tasks, such as validating the new value of the property, converting the value to a different data type, or triggering other methods or events in the component.
Let’s understand this with the below example:
import { LightningElement, api } from 'lwc';

export default class MyComponent extends LightningElement {
    @api message;

    set message(value) {
        this._message = value.toUpperCase();
    }

    get message() {
        return this._message;
    }
}
In this example, we are creating a component MyComponent that has a public property called message, it is defined using the @api decorator. Inside the component, we are defining a setter method for the message property that converts the value of the property to uppercase and assigns it to a private property called _message.
By using a setter method to update the component’s state when the message property is changed, we can ensure that the component’s state is always consistent with the value of the property. In this example, by converting the value of the message property to uppercase, we can ensure that the value of the property is always displayed in uppercase, regardless of how it was entered.
Here’s an example of how the MyComponent the component could be used in another component:
<template>
    <c-my-component message="Hello, World!"></c-my-component>
</template>
In this example, we are using the MyComponent in another component’s template and setting the value of the message property to "Hello, World!". When the message property is set, the setter method in the MyComponent is called, and the value of the property is converted to uppercase and assigned to the _message property. The component’s state is then updated based on the new value of the property, and the component is re-rendered to reflect the new state.
It is important to note that the setter method is called every time a public property’s value changes, whether the change is initiated by the component itself or by another component that is using the component. By customizing the setter method, we can control how the component’s state is updated when a public property is changed.
By updating the state of the component based on the new value of the public property, we can ensure that the component is always in sync with its surroundings and is able to respond to changes in its environment.
connectedCallback() in LWC
The stage of parent insertion into DOM occurs when a Lightning Web Component (LWC) is inserted into the Document Object Model (DOM) of its parent component. The DOM is a hierarchical tree-like structure that represents the structure of a web page or application.
During this stage, the parent component is added to the DOM, which means that it becomes visible and can be interacted with by the user. The connectedCallback() lifecycle hook is called during this stage, which is a method that is called when the component is added to the DOM. This method can be used to perform any actions that need to be taken when the component is added to the DOM, such as initializing the component’s state, fetching data from an external source, or registering event listeners.
Let’s see this with an example:
import { LightningElement } from 'lwc';

export default class MyComponent extends LightningElement {
    connectedCallback() {
        console.log('MyComponent connected to the DOM');
        // perform any initialization or setup here
    }
}
Let’s modify the code of MyComponent to override the connectedCallback() method. When the MyComponent is added to the DOM, the connectedCallback() method is called, which logs a message to the console indicating that the component has been connected to the DOM.
The connectedCallback() method can be used to perform any initialization or setup that needs to be done when the component is added to the DOM. For example, you might use the connectedCallback() method to fetch data from an external API, register event listeners, or set up timers or intervals to update the component’s state.
In this example, we are using the MyComponent component in another component’s template. When the component is added to the DOM, the connectedCallback() method is called, which performs any necessary initialization or setup.
During this stage, it is also possible for child components to be inserted into the parent component’s DOM. Child components are components that are defined inside the parent component’s template and are rendered inside the parent component. When a child component is inserted into the parent component’s DOM, its own lifecycle hooks are called, including the connectedCallback() method.
By performing any necessary initialization or setup in the connectedCallback() method, developers can ensure that the component is properly configured and ready to be used by the user.
renderedCallback() in LWC
The renderedCallback() is another lifecycle hook in Lightning Web Components (LWC) that is called after the component has finished rendering and all child components have been added to the DOM. The renderedCallback() can be used to perform any actions that need to be taken after the component has been rendered, such as updating the component’s state, manipulating the DOM, or interacting with child components.
The renderedCallback() is called every time the component is re-rendered, either because the component’s state has changed or because one of its child components has changed. This makes the renderedCallback() method a good place to perform any actions that need to be taken after the component has been updated.
Here’s an example of how the this hook can be used to perform an action after the component has been rendered:
import { LightningElement } from 'lwc';

export default class MyComponent extends LightningElement {
    renderedCallback() {
        console.log('MyComponent rendered');
        // perform any actions that need to be taken after the component has been rendered
    }
}
In this example, let’s modify MyComponent to override the renderedCallback() method. When the MyComponent component is rendered, the renderedCallback() hook is called, which logs a message to the console indicating that the component has been rendered.
This hook can be used to perform a variety of actions, depending on the needs of the component. For example, you might use the renderedCallback() method to manipulate the DOM, update the component’s state, or interact with child components.
connectedCallback vs renderedCallback in LWC
Let’s compare these two Lifecycle Hooks to understand them in a better way:
| connectedCallback() | renderedCallback() | |
|---|---|---|
| Description | Called when a component is inserted into the DOM. | Called after a component has finished rendering or re-rendering. |
| Usage | Use to manipulate the component’s DOM or perform other initialization tasks. | Use to perform additional tasks after the component’s template has been rendered or updated, such as updating the component’s attributes or interacting with external APIs. |
| Parameters | None. | None. |
| Return Value | None. | None. |
| Frequency of calling | Called once per component instance, when it’s first inserted into the DOM. | Called multiple times per component instance, whenever the component is rendered or re-rendered. |
| Order of execution | Called before the component’s template is rendered. | Called after the component’s template has been rendered or updated. |
| Performance impact | Minimal. Can be used to perform small DOM manipulations, but should not be used for heavy computations. | Can be used for more complex tasks, but should be used judiciously to avoid negatively impacting performance. |
| Caveats | Cannot interact with child components, as they may not be connected to the DOM yet. | Can cause performance issues if used excessively or for computationally intensive tasks. Should not be used to make changes to the DOM that depend on data returned asynchronously or data that changes frequently, as this can lead to flickering or other visual artifacts. |
In general, connectedCallback() is used to perform initialization tasks and small DOM manipulations, while renderedCallback() is used for more complex tasks that require access to the component’s updated attributes or data. Both hooks are important for building high-quality Lightning Web Components that are flexible, efficient, and easy to maintain.
Let’s understand disconnectedCallback() in LWC
The disconnectedCallback() method is a lifecycle hook in Lightning Web Components (LWC) that is called when the component is removed from the DOM. This can happen when the component is destroyed, when the user navigates away from the page, or when the component is hidden or removed by other means.
This hook can be used to perform any cleanup actions that need to be taken when the component is removed from the DOM, such as unregistering event listeners, canceling timers or intervals, or resetting the component state.
Here’s an example of how the disconnectedCallback() hook can be used to perform cleanup actions when the component is removed from the DOM:
import { LightningElement } from 'lwc';

export default class MyComponent extends LightningElement {
    connectedCallback() {
        window.addEventListener('resize', this.handleResize);
    }

    disconnectedCallback() {
        window.removeEventListener('resize', this.handleResize);
    }

    handleResize() {
        // handle window resize event
    }
}
Let’s rewire MyComponent that overrides the connectedCallback(), disconnectedCallback(), and handleResize() methods. When the MyComponent is added to the DOM, the connectedCallback() method is called, which registers an event listener for the resize event on the window object. When the MyComponent component is removed from the DOM, the disconnectedCallback() method is called, which unregisters the event listener using the removeEventListener() method. This ensures that the component does not continue to listen for the resize event after it has been removed from the DOM, which can help to conserve resources and prevent memory leaks.
The hook can be used to perform a variety of cleanup actions, depending on the needs of the component.
errorCallback() in LWC
The errorCallback() is a lifecycle hook method in Lightning Web Components that gets called whenever an error occurs during the rendering or lifecycle of the component. This method provides an opportunity for the component to handle the error and perform any necessary cleanup or recovery operations.
The hook takes in two arguments: error and stack. The error the argument is the error object that was thrown, while the stack argument is the stack trace for the error. The errorCallback() hook can use these arguments to handle the error in a variety of ways, such as displaying an error message to the user, logging the error for troubleshooting purposes, or attempting to recover from the error and continue rendering the component.
Here’s an example of how this hook can be used to handle errors in a component:
import { LightningElement } from 'lwc';

export default class MyComponent extends LightningElement {
    connectedCallback() {
        try {
            // attempt to do something that might throw an error
        } catch (error) {
            this.errorCallback(error, error.stack);
        }
    }

    errorCallback(error, stack) {
        // handle the error
        console.error(error);
        console.error(stack);
    }
}
Let’s modify MyComponent to override the connectedCallback() and errorCallback() methods. In the connectedCallback() method, we try to perform an operation that might throw an error. If an error is thrown, we catch it and call the errorCallback() method with the error and stack arguments. In the errorCallback() method, we handle the error by logging in to the console using the console.error() method.
Conclusion
In conclusion, understanding the lifecycle flow and hooks in Lightning Web Components is essential to building high-quality, efficient, and reliable components. By following the lifecycle flow, you can ensure that your components are created, updated, and rendered correctly and that any necessary cleanup or recovery operations are performed when needed.
The different lifecycle hooks, such as constructor(), connectedCallback(), renderedCallback(), disconnectedCallback(), and errorCallback(), provide you with opportunities to execute code at different stages of the component lifecycle, handle errors and exceptions, and perform additional tasks, such as manipulating the DOM or interacting with external APIs.
By mastering these concepts and techniques, you can build powerful and flexible components that can be easily integrated into larger applications and customized to meet a variety of user needs. So, take the time to learn about the Lightning Web Components lifecycle flow and hooks, and start building amazing components today!
FAQs:
References:
- Lifecycle Flow – Salesforce Lightning Component Library
- Lifecycle Hooks – Salesforce Lightning Component Library
Abhishek
Mr. Abhishek, an experienced Salesforce Application Architect with over 8+ years of development experience and 11x Salesforce Certified. His expertise is in Salesforce Development, including Lightning Web Components, Apex Programming, and Flow has led him to create his blog, SFDC Hub.